PETTY PAINTBALL FIELD AND
PROSHOP
512-601-3235
Serving Central Texas for 9 YEARS!!!

|
PETTY PAINTBALL FIELD AND
PROSHOP Serving Central Texas for 9 YEARS!!!
|
|
Tourneys, Playdays and Big Games Nel-Spot 707 Resto |
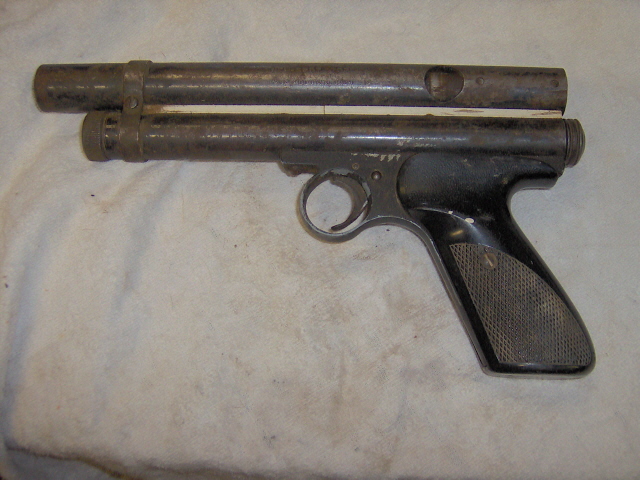
Ahhh... the restoration project....
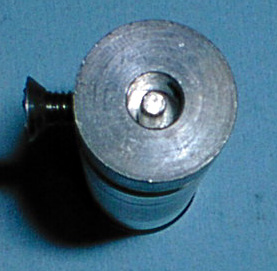
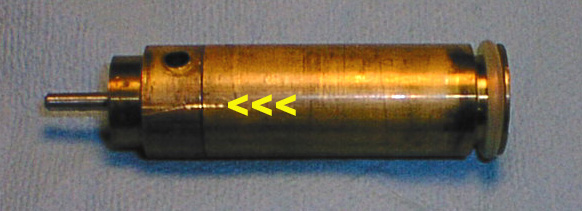
Here is a shot of a 707 project as it came out of the box. A little rough, a little abused, missing the feed tube assembly and sights, but otherwise compete and that's actually dirt caked on the gun from laying around for years and years - it cleaned up nicely as you will see later! The most notable thing about this one: This is a one owner marker that I bought from the original owner who used it on a cattle ranch in Southern California. He told me he removed the feed tube because it was too hot and that the wax paintballs would melt or get soft in the tube and crush when loaded or explode when fired. He kept them in a cooler, then feed them in one-by-one when needed and was quite effective that way! The white plastic "barrel spacer" is toast just like every other 707 I have seen. Luckily, I have been restoring and shooting Crosman pellet guns for some time so this will be a fun project as I know where to get most of the parts, and can make the rest. MAKE SURE THE MARKER IS DEGASSED!! I usually start by a complete disassembly. Make sure you keep all the screws and parts - if you loose them, they can be pretty hard to find or you may have to make them or have them made. You can look at the photos and see how I put it back together if you have a question about taking it apart. I start by taking off the sights, then the bolt and handle and then front feed tube plug and cap off of the back. Next take the screw that goes thru the band at the front of the barrel/pressure tube assembly. Now, if you look down thru the two holes in top of the barrel assembly, you will see a couple of flathead slotted screws. These two screws hold the barrel on the top of the pistol. Remove the two screws and lift the barrel off but be careful as the white barrel spacer and breech seal will come off with the barrel. Now that the top end is off, lets start on the bottom. Take off the front cap off of the pressure tube. Take the grips off of the grip frame to give you room to get to the back mounting screw. As you remove the back screw from the grip frame, hold the rear cocking knob in with your finger as it is spring loaded and may shoot out if you don't hold it! The next step is removing the front screw from the grip frame. Be very careful as you remove this screw as there is a tiny ball bearing and spring in the frame over the safety. Just hold the frame to the pressure tube as you remove the screw. After the screw is out, carefully separate the grip frame from the pressure tube while holding the frame upright. Then carefully dump the spring and ball bearing out on something so it won't roll away! Take a rag and clean out the inside front of the pressure tube to remove any dirt or debris. Put a little oil in the front of the pressure tube and spread it around on the inside to assist in removing the valve. Now, with the pressure tube standing up with the back end up, take a 1/8" pin punch and push down on the valve pin inside the tube. Look down inside the tube and you will see a round piece with a small pin sticking up in the center. This is a shot of the valve and the round piece removed from the tube of a trashed gun so you can see what it looks like down inside. You want to push on the pin in the middle and not the metal ring!! DO NOT ATTEMPT TO REMOVE THIS RING FROM YOUR 707 AS YOU MAY DAMAGE THE GUN, ONLY PUSH ON THE VALVE PIN TO REMOVE VALVE!!!!!
That pin in center is what you want to push on to get the valve out of the tube. Put the pin punch on the valve pin and push down until you feel the pin "bottom" against the front of the valve. You can usually just bump the punch with your hand and it will start moving. You may have to tap it gently with a small hammer to get it moving, but MAKE SURE THAT YOU HAVE THE VALVE PIN PUSHED DOWN AND YOU ARE ON THE PIN AND NOT THE ROUND PIECE OF METAL BEFORE YOU TAP ON IT! After it moves down a little, you can usually push it out with a rod or long allen wrench. Now, it's time to clean up parts, re-blue as necessary and rebuild the valve assembly. Yes, this is a real steel pistol that was originally blued like all fine firearms!
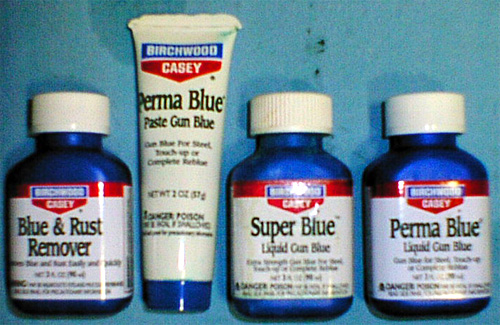
It took some time to clean all the parts along with a lot of elbow grease and steel wool and polishing cloth. I used these Birchwood Casey Products for stripping and re-bluing the parts. Use the blue and rust remover to clean the parts, then blue with any of the others. The paste works well on smaller screw heads and such. Follow the instructions on the bottles and it works pretty well. There are a lot of little parts that need to be blued, but if your marker is in pretty good shape initially, you may not have to re-blue every nut, bolt, etc. You will have to keep the marker oiled lightly as it is steel!
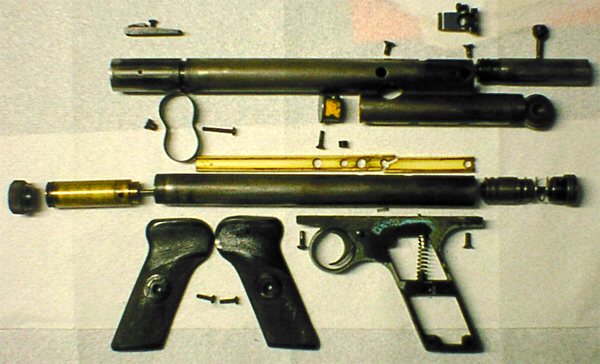
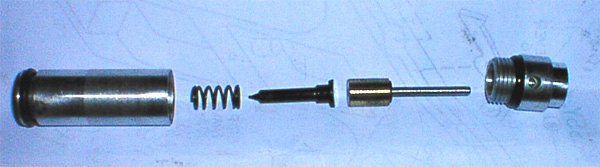
Here is a shot of another 707 that I had photographed earlier to show one exploded. This is what you will have if you have followed the instructions.....This particular one had the standard slab grips, the other two I own have the deluxe version of the grips. I have seen both kinds in many different colors as that is the way Crosman built them, even in the Pellet pistol area. Notice the white plastic barrel separator is broken into a couple of pieces. It is also a universal piece used on a couple of different Crosman Pistols so it has extra holes to accommodate them. Note the yellow and blue oil based paint still stuck on some of the parts and that the feed tube is tack-welded to the barrel along with the two screws that hold it on (the tacks don't show from this side). The parts will be cleaned, re-blued where necessary and a fresh coat of black wrinkle on the grip frame.
Here is a close up of the valve after it was removed. Notice the index mark I scribed across the joint between the front and back half of the valve assembly BEFORE I take it apart. This will help you get it close when you put it back together. We will "fine-tune" it after it's back in the tube. If you hold the valve front body and stick a 5/32 pin punch in the valve hole, you can usually unscrew it by hand. If you need, use padded pliers or a strap wrench on the body. You can also use some wood between the jaws of your vise and the body, but it's usually not very hard to unscrew them. They didn't use locktite on them from the factory.
Here is another valve that I disassembled. It's flipped 180 degrees from the previous picture. The o-ring on the front (left in picture) broke when I removed it. The felt filter is in two pieces in this picture. Left to right: o-ring, piercing body, filter (in two pieces), screen, washer, check valve spring, piercing spacer, spacer, exhaust valve assembly, o-ring, exhaust valve. 2K and later Cocker front block o-rings work well for front and back of the valve. That's where most of these leak. I would advise you to spin the exhaust valve assembly with a drill and polish the steel shaft and brass head with steel wool so it slides smoothly in the back and looks good. Oil it up, put in the o-rings, reassemble it. The spring/pierce pin or spacer can go in first, it doesn't matter but everything else must go as shown. A few drops of oil in the felt filter on the front of the valve will help keep everything lubbed.
This is a picture of the other style valve without the filter assembly disassembled. This is probably the more economic valve assembly to get a couple of more shots per 12 gram as there is no space for CO2 to expand in the area where the felt is. Also notice it's all aluminum front and back bodys. OK, let's put it back together.
|
Send mail to info (at) pettypb (dot) com with questions or
comments about this web site.
|