
|
|
|
| The Adventure Begins..... I spent quite a while searching, re searching, looking, shopping and gathering every tidbit of information on motorhomes and coaches I could find. It did not take long to rule out most of the mass produced stick-and-staple type of motor homes. The ones left were out of my price range. Then I started looking at Coach and Bus Conversions on the Internet and my focus narrowed to this area. There is a ton of good information out there and I have provided a links page with some of the ones I found useful there. It may save you a minute or something more valuable. From the beginning I took a slightly different approach than most conversions. Since most of the places I tend to go are more out of the way, a standard motor home or coach wouldn't cut it. I remembered riding a school bus off and on for 12 years thru all kinds of weather with only a hand full of breakdowns. The more I looked, the more I liked a "Skoolie" - mainly because they are better suited to my purpose and are pretty rugged. They are also much safer than most of the mass-produced types of motorhomes. After searching around a little, we purchased the Wayne Lifeguard coach sitting on an International Loadstar frame you see below. It is a 1976 with a gas engine, automatic transmission, power steering and air brakes which make it pretty easy to get around in and it's built like a TANK! Good place to start for something to take to Paintball Tournaments and Scenario Games and have an interior place to relax, eat, work and clean up. That clean up part is pretty important when you are covered in paint, mud, dirt, sweat, etc. from a hard day "playing"...... OK, enough babbling, on with the story.....
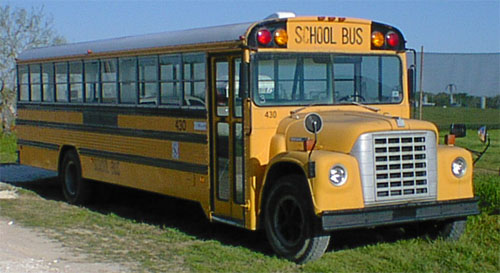
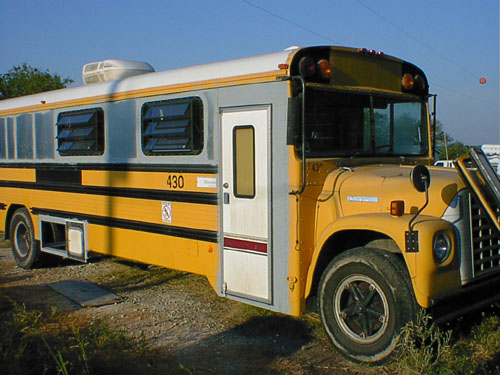
Here is a picture of the Bus the day we drove it home the first weekend in April, 2003. It was retired in November 2002 from life as a band bus for a Texas High School. This is the start of a MAJOR project. The exterior is solid, rust free and pretty straight with lightly faded International School Bus Yellow paint. All the glass in intact, the electrics all work and it runs very well and smooth. The interior was full of seats that were removed and used for other things. A 1/2 inch breaker bar and socket on top and a 1/2 inch air impact wrench on bottom with a variety of extensions and flex joints and it still only took my son and I five-and-a-half hours of busted knuckles and dirt in the face to get all those suckers out....... Everybody has seen pictures of seats in/seats out, so I will spare you the torture!
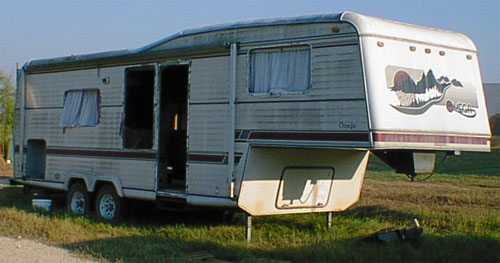
Later that same month, a friend from work told me about a used 5th wheel with some leaks that he was selling pretty reasonable. The rubber roof had a couple of small leaks that were not detected for a few months, so the interior had minor damage and some mold and mildew, but otherwise was in good shape with ALL appliances working well. This is a picture of the donor 5th wheel that would provide many parts. In fact, it has already been scavenged pretty well in this picture! Most of the RV specific parts we removed would add up very quickly if purchased new. So far, we have removed windows, entry door, numerous small access doors and vents, roof A/C, a large 2-way Norcold refrigerator, cooktop/oven with vent hood, converter, Winegard TV antenna, toilet, small tub, sink, water heater, 18 foot awning, central heat system, numerous light fixtures, fittings, etc.. and I have a shell with electric brakes and electric jacks to I can turn into a toad trailer later!! The water/gray/black tanks would not fit under the bus, so they were not removed. This alone probably saved us between 3 and 5 thousand on the conversion just in money saved on all those parts. I plan to get most of the rest of the important parts before I start construction so I can measure them beforehand and make everything fit together better. This is a major puzzle that will unfold over the next year or so.
Fast-Forward to Mid August 2003....it's hot in Texas...most of the parts have been collected, measurements taken, plans laid out, it's time to go to work. This project has been in the planning stage since the initial purchase in April. Make a plan, see something you like better, change the plan - and so on and so on.....Things kinda floated around from the extremely simple "dry place to stay and still haul a team" when going to tournaments and games to a fully appointed castle. When the 5th wheel came along, things got going in a positive direction. Instead of best guessing and making mistakes that cost money, most of the parts came together in a package. A bonus of getting the 5th wheel, I could see how things were mounted and installed. I could take notes on how the wiring and plumbing was ran. This alone helped out tremendously. After salvaging all the usable parts from the trailer, I took an inventory and starting trying to figure out how to pay for the MISSING stuff I needed to complete the project. As the parts were removed from their respective places, the holes were measured and carefully recorded. With a tablet full of measurements including the dimensions of the bus, the real planning began. Using my favorite drawing program CorelDraw, I started drawing floor plans and making parts lists. The parts included expensive things like: batteries, LP tanks, might as well replace the LP reg, too - just for safety, genset, water/black/gray tanks, plumbing, electrical, 12V, inverter, microwave, some vents and covers, insulation, then on to the interior. The outside is shaping up pretty well so far. Still lots of work to do, but I like building on a solid foundation so that's where I started.
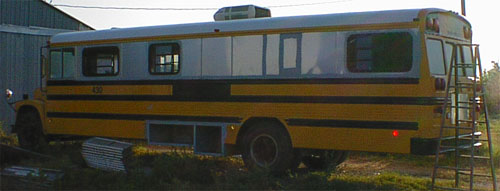
Here is a left side shot after a couple of days of work. All the original bus windows rattled like crazy so they had to go. They were removed and the holes were framed for the windows removed from the 5th wheel in the right place to match the interior. They are DOT Hehr RV windows and look much nicer than the originals! The windows were framed with 1 1/2 inch .083 mild steel square tubing welded to the original framework in the coach. The welds on the exterior were ground smooth and then primed inside and out. After primer had set, the .050 skin was added, then primed about 5 inches around the window hole. After this primer had dried, the RV windows were installed in the holes with screws into the tubing frame. I haven't installed the trim strips around the windows yet as I have to prime/paint and that will include masking the windows. The small band of primer behind the windows will help when I prime and paint completely a little later. The exterior will be Gloss Grey Polyurethene. The bays on the side are not complete, only framed in. You can see the stack of removed bus windows just to the left of the bay on the ground.
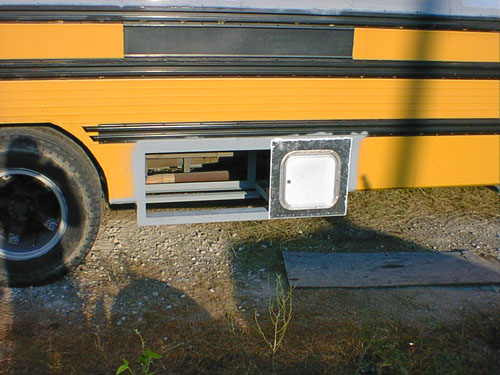
Here is a close up of the bay on the left side. The bay in the back will hold 4 BBQ sized LP tanks between the axles of the coach. There is a 1/8 inch mild steel plate welded on the back of the frame in case of tread separation on a tire. The racks directly in front of that is for 4 6V golf cart batteries. The front section will hold the 6 gallon LP water heater, the converter/charger, the plug from the genset and the shore power cable. The floor is not in the front bay yet. A plywood wall goes between the batteries and the front portion also. The doors are partially built, but not installed. The bay is attached only to the box frame of the bus and not welded to the actual International truck frame underneath, so no structural compromises on the frame and it will move with the box as the bus goes down the road.
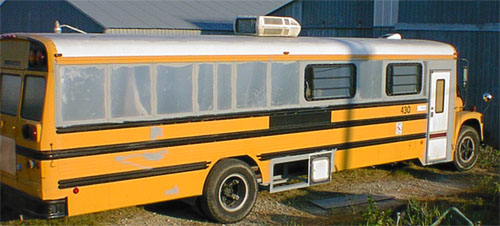
Here is a shot of the right side. This side has two windows in front and the entry door removed from the 5th wheel. The window in the door will have to be replaced with a clear DOT glass and may have to be enlarged for right side view when driving. The roof AC can also be seen. The bay on the side is for the genset and it's battery. There are two powered vents with Max-air covers going on the roof for the bathroom and bedroom. The 18 foot awning from the 5th wheel goes on this side, too.
A close up of the right bay. The frame on this side is attached to the box frame also. The door on the right is for battery and connection access. The side between the tires and genset will have a welded in 1/8 inch plate like the other side in case of a tire failure. Insulation will be added between the top of this box and the coach for noise and heat/cool. The back will have plywood to stop some of the noise into the coach also. A Generac QuietPac G40 with remote start/kill will fill the hole, but it is large enough for others (specifically, a Honda 4010). Notice how I forgot to prime around the hole BEFORE I installed the door.....DOH!!
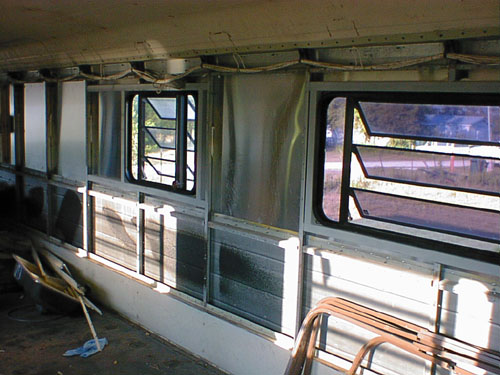
The interior so far....not much to see here, yet! You can see the 1 1/2 inch square tube frames welded to the existing structure for window frames. This maintains the rollover strength of the Wayne Lifeguard coach. That's the interior trim rings for the windows in the bottom right of the photo. That piece of metal near the floor on the wall is a piece of 3/32 inch mild steel impact strip with a 1 1/2 inch lip on top that runs the length of the interior at the floor and is left is place to maintain the strength in case of a side impact.. I plan to make the bottom portion of the walls as thick as this lip to use as an accessible place to run the wiring.
Here is a shot of the front right of the bus. The window in the door will have to be replaced with a clear DOT glass for right side driving safety. The door was framed with the same 1 1/2 inch mild steel square tubing, then ground, primed, skinned, primed, then the door was screwed in. The School Bus Flashers on the front and back will be removed and skinned over. The bus runs well, so it gets turned around regularly to take advantage of the evening and morning shade! Notice the high tech door-holder-opener-bungie-thingie hanging from the mirror.......
It's early September when these pictures were taken, work is continuing. Stay tuned...
|
Send mail to info@pettypb.com with
questions or comments about this web site.
|